OLM files are a popular file format which stores the entire mailbox data of Outlook for Mac just like PST files. But unlike PST files, it is nearly impossible to access OLM files in any other device except for Mac devices which becomes an issue when collaborating with non-Mac users. This is one of the most compelling reasons that drives users to look for ways to shift from Outlook for Mac to Office 365. This write-up presents a few driving factors which move users to shift from Outlook for Mac to Office 365 and outline some practical methods to do so.
Key reasons to consider shifting OLM files to Office 365
Every user has different reasons to import OLM files to Office 365 depending on their situation and requirement. We’ve compiled some of the most common reasons below:
- Compatibility issues: Since OLM files can be solely accessed through Outlook for Mac, it becomes tough for users to share their data with non-Mac users.
- Better security features: Office 365 suite offers impressive features and better options for securing your mailbox data as compared to Mac’s Outlook, which makes it a preferred choice of users.
- Shifting devices: A need to shift data from Outlook for Mac to Office 365 arises when users need to shift devices or when shifting from Mac OS to Windows OS.
- Easy accessibility: Since Office 365 is a cloud-based platform, it’s very easy to access the stored data from anywhere, at any time as long as you have access to it.
- Automatic maintenance: Office 365 regularly updates its UI and fixes any and all issues present without delay.
Manual approaches to import OLM files into Office 365
Although importing OLM files to Office 365 directly is impossible, we’ve listed two workarounds to guide you through this process. The first method consists of converting your OLM files into PST format via Gmail and then importing them to Office 365 and the second method includes converting the OLM files to EML format and then converting them to PST format. Let’s have a look.
Method 1: Configuring Gmail in Outlook for Mac
This method is divided into three distinct steps. First, we’ll be configuring your Gmail account in your Outlook for Mac account to convert the OLM files to PST format. Secondly, we’ll configure the same Gmail account in Windows Outlook and then in the following step, we’ll upload the PST files to Office 365. Let’s have a look at the detailed procedure below:
Step 1: Configure Gmail in Outlook for Mac
Make sure that IMAP is enabled in your Gmail account before attempting this step and create a backup of your entire mailbox data to avoid data loss. Follow the steps below to configure Gmail in Mac’s Outlook:
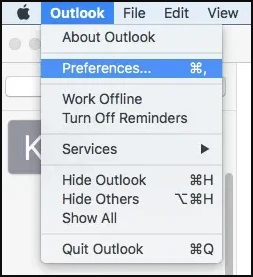
- Open Outlook on your Mac’s device and navigate to the Outlook tab. Then click on Preferences.
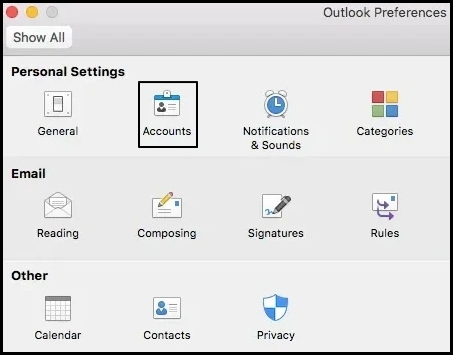
- Under Personal Settings, click on Accounts. A new window will open.
- In the newly opened window, click on the (+) plus icon located in the lower left corner of your screen and choose New Account option.
- Enter account details such as email address and password. Enter imap.gmail.com in the Incoming server section and input the value as 993. Tick the Use SSL to connect checkbox.
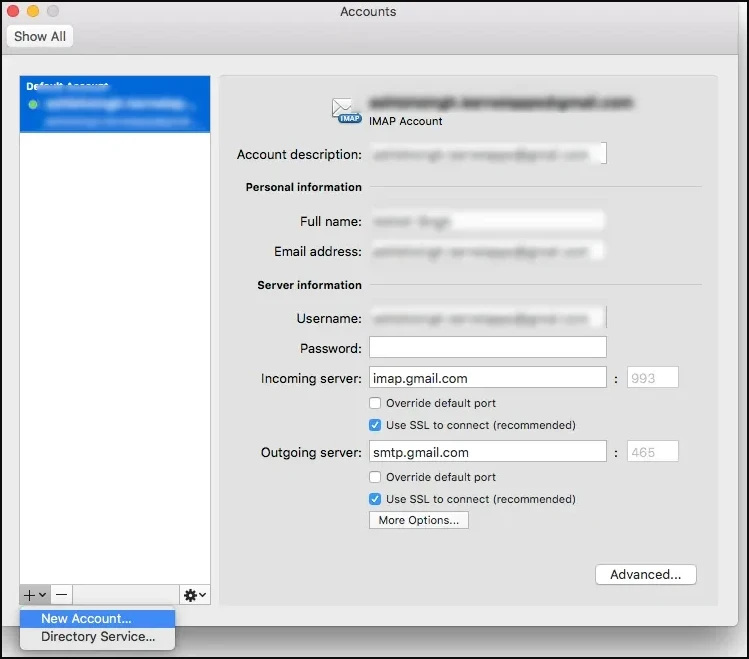
- Enter smtp.gmail.com in the Outgoing server section and input the value as 465.
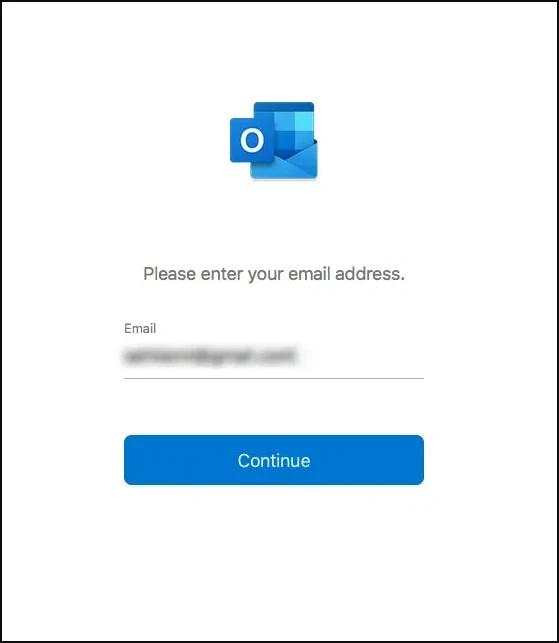
- Enter your Gmail ID and password and click on continue to add your account.
- Now, right-click on the newly configured Gmail account and choose New Folder from the list.
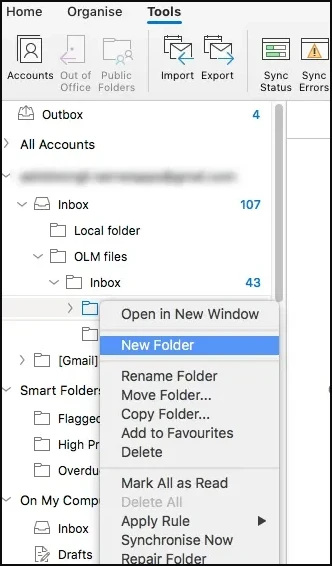
- Now rename your folder and navigate to the File tab and click on Import.
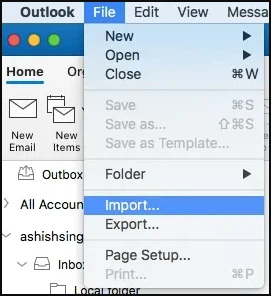
- In the Import wizard, choose Outlook for Mac archive file (.olm) and press Continue.
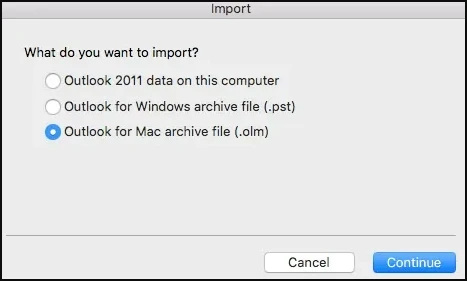
- Choose the required OLM file and then click on Import.
- Click on Done once the process is successfully completed. Your chosen mailbox data will get imported into Mac’s Outlook.
- Right-click on the OLM files you just imported into Outlook for Mac, click on Move and select the Choose Folder option.
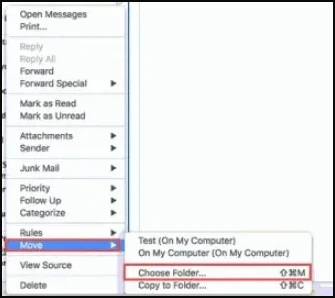
- Refresh your Gmail account and check if the files are successfully shifted from Outlook for Mac to Gmail.
Step 2: Configure the same Gmail in Windows Outlook
Now configure your Gmail account in Windows Outlook to convert it into PST format and then import it to Office 365. Learn the steps below to configure your Gmail account in Windows Outlook:
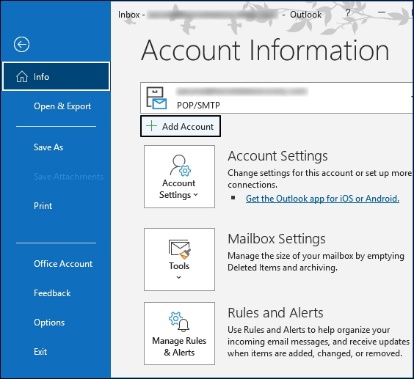
- Launch Outlook on your device and navigate to the File tab and click on Add Account option.
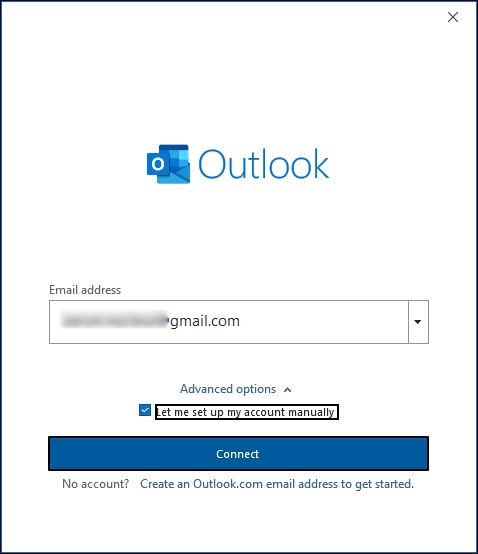
- Now, enter your Gmail address and tick the Let me set up my account manually checkbox. Then, click on Connect.
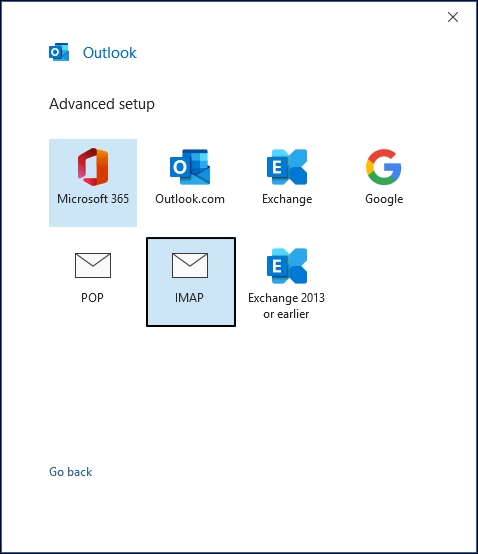
- Enter your Gmail ID and password andselect IMAP as the account type.
- Now, type imap.gmail.com in the Incoming Server section and input the value of the Incoming Service port as 993.
- Similarly, type smtp.gmail.com in the Outgoing Server section and input the value of the Outgoing Server Port as 465.
- Choose SSL as the encryption type and click on OK.
- Now choose the Test account settings and then click on Finish.
Now you can easily shift all the OLM files from Gmail to Window’s Outlook and convert them to PST format via the Import/Export feature of Outlook. Then we’ll successfully import all the converted PST files to Office 365 mailbox.
Method 2: Drag and drop method
This method involves dragging OLM files from where they’re stored in Mac’s Outlook to a newly created folder. However this method is not feasible for users having large mailboxes since you can shift one email at a time. This method can also be used to convert OLM files to EML format. The steps below to perform this process are:
- Launch Outlook on your Mac device and create a new folder to store all the OLM files.
- Now drag the email of your choice from where it’s stored to the newly created folder.
- Repeat this process as much as necessary to move all your required files.
Challenges incurred while performing these methods
Although the methods discussed above do provide desirable results, they can carry several risks with them which may lead to data loss in the worst cases.
- These manual methods are extremely lengthy and time consuming, often having multiple steps which makes it difficult to import large mailboxes.
- Lengthy and repetitive nature of these processes can give rise to quite a few errors, whether it be human or technical, leading to unfavorable scenarios like data corruption or data loss.
- It is not possible to import a huge batch of OLM files at once with these methods which makes it impractical for business professionals to attempt these methods.
- There’s a high chance that the data integrity and data structure of your OLM files can get disrupted while performing these techniques. Disrupted folder structure can lead to confusion and misplaced data.
Automated approach to import OLM files to Office 365
Considering manual methods have several drawbacks and a high chance of error, it’s best to opt for a professional OLM to Office 365 migration tool to solve all your import issues. Kernel for OLM to PST is a feature-rich software developed to streamline your import process and shift all your Mac mail data to Office 365 efficiently. With its beginner friendly UI and the feature of bulk conversion, this tool is a go-to for individuals and organizations alike. Users can easily convert multiple OLM files to multiple formats along with PST including, PDF, MSG, DOC, DOCX, HTML, EML, etc. while maintaining the data hierarchy and keeping the data integrity intact.
Conclusion
Importing OLM files to a trusted cloud platform such as Office 365 is a wise choice made by several organizations and business professionals, primarily to back up essential data and for easy accessibility. We’ve outlined two practical methods to successfully import your OLM files to Office 365 along with the challenges one might face while performing these methods. Additionally, we’ve also mentioned an advanced OLM to Office 365 migration tool for a smooth OLM to Office 365 import experience.


0 Comments